You’ve worked hard on your website and are proud of all you have learned and accomplished. You are getting close to making your new website live, but you keep wondering if you have all the bases covered. How can you know what you don’t know? Then you think, “Am I ready to launch?”
This post will help you double-check that you have covered all the basics. The stuff you may know and the other things you probably didn’t think about. Now you’ll know.
Before you launch, run through this easy pre-launch checklist to ensure all the settings and options available to you are where you want them. Once complete, you are good to go for launch.
Check all Your Primary WordPress Settings:
General:
Check your site title and tagline are correct.
Set your timezone and date format.
Make sure you have an Admin email address that uses your website domain. This is for security and to make sure you receive all website emails.
Writing:
Set your default blog category.
Default post format: Standard.
Post via email settings are available if you are going to use them.
Reading:
Your Homepage Displays settings should already be set to display your theme correctly.
Set the number of Blog and Syndication posts. I usually set at 5 and 5.
Set each post in the feed to Excerpt. We want folks to come to your site to read your articles.
Search Engine Visibility: Uncheck “Discourage search engines from indexing this site.”
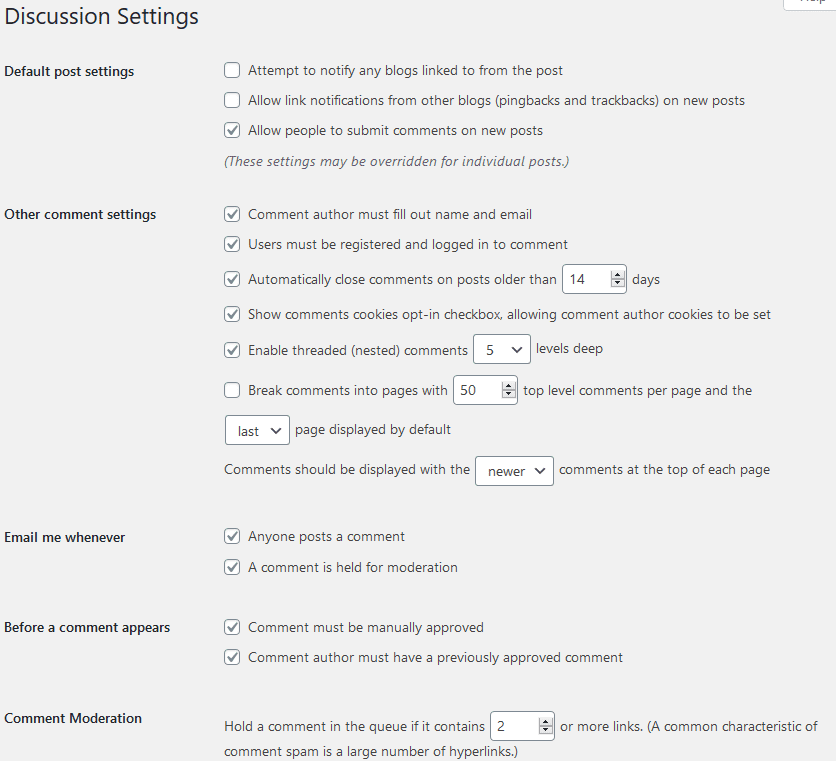
You can uncheck “Users must be registered and logged in to comment” only if you have strong comment spam protection in place. For all my sites, whether I have comments or not comments, I use Clean Talk Spam Prevention.
Lower down on the Discussion page, you’ll find your Avatar settings to select based on your preference.
Show Avatars?
Set your website Rating.
Select your Avatar design.
Media:
Set your image sizes to any custom sizes designated by your theme. Otherwise, the defaults are fine as is.
Check if you want to organize your uploads into month-and-year-based folders. I always have this checked. (Here’s a plugin I have used to manage my media library.)
You also have the option to set custom structures for your categories and tag URLs. By default, WordPress uses /category/ as the base for your category URLs and /tag/ for the tags pages.
But, you do have the option to change those if you feel you need to, for example:
This is where you will designate your Privacy Policy Page. You must have one before you launch so visitors know what data you are collecting and what you will do with it. WordPress includes a guide to help you. Click “Check out our guide.”
Theme Specific Settings
Delete any starter/dummy content you are not using (including images in the Media Library) installed with your theme. Look at both pages and post areas for any you will not make live on your site and send them to trash.
Make sure all your theme-specific settings are in place. Some themes install their own dashboard that you can access from the left sidebar of your dashboard. Others can be found in Appearance > Customize.
Go through every theme setting to ensure everything is set how you desire.
Appearance Customization Settings
You’ll want to go through each section and double-check the settings within. I’m using my site, which uses Kadence so that you can see all the customization options available.
Colors and Fonts: Kadence allows you to designateyour site-wide color palette and the fonts you want to use.
Header: Graphics, layout, styles.
Footer: Build your footer with columns and widgets.
General: The basics.
Post/Pages Layout: Layout, design, title position, padding, and so much more.
Search Results: Customize how content will display when searches are performed on your website.
Site Identity: Includes your logo and site icon (favicon). Use the exact size that your theme provider advises for the logo to get the best results. For your favicon, you’ll need a graphic that is 512 x 512. My article How to Further Your Brand with the Right Favicon has additional tips.
Menus: What, where, and order of.
Widgets: Various widget areas and settings.
Homepage Settings: Hompage-specific settings that you can customize
Additional CSS: This is where you can add your own CSS snippets to override your theme’s CSS.
Custom Scripts: These are for snippets like those provided by Google Analytics and other services to verify your website and collect data.
Yoast SEO Breadcrumbs: How and where they will display.
Images
One of the primary reasons WordPress websites receive poor performance scores is unnecessarily large image files. Images are uploaded in sizes that are too large for what is needed to display—many times by thousands of pixels.
You want to know the exact size required by your theme for specific areas. Then, create and upload images no larger than necessary. This process is critical to your site’s speed metrics.
Use recommended image sizes for your theme. (Header, Logo, Featured)
If you’re relaunching your old website, add 301 redirects for any URLs that have been changed or removed. (Yoast SEO Premium includes automatic redirecting when you change permalinks.)
Set up a cookie consent notice (and, if in California, CCPA compliance).
Important Tasks Many Overlook
Design a custom 404 page. With Kadence, you can set up a custom 404 page element. If you are not using Kadence, check out the 404 to 301 plugin for pages/posts you’ve removed to redirect to an informative page to guide visitors.
Update your Copyright date in the footer. Then, mark your calendar to do so each December, too. (Also, remove the theme name and link if there is one.)
Update your social media account headers to match your new site logo/colors/theme.
The above is not the end all be all. Parameters, plugins, and strategies will change based on your type of business and what you want to accomplish.
Many launch their website and then sit and wait. Or expect search engines to start sending traffic immediately. With this approach, you’ll be sitting and waiting a long time. Nothing happens online by happenstance or osmosis.
You have to make it happen and keep making it happen. Here’s your next step…
*Some of the links on this page are to companies I have a professional affiliation with. Read my full affiliate statement here.
Yeah, I use cookies (no personal info) to offer you the best experience on my website.
If you continue to use this site, I will assume that you are good with that.